PSpice(schematic)
PSpice (schematics) Tutorial Performing...
https://things-for-students.blogspot.com/2011/12/pspiceschematic.html
Performing simulation using PSpice is the easiest part to any beginner because just drawing the schematic diagram of the circuit.the procedure to start with schematic is given below:
Step 1: start menu->all programs ->PSpice student-> Schematics
When you click on the schematics then a window will open as shown below
Step 2: To draw schematics go to draw option on the tool bar, then click on Get New Part. After clicking on the box another box will open containing all the parts list.
Step 3: Draw the schematic diagram of your circuit. You will find approximately every component in component box.
1. To find dc power supply type in the component box: VDC
2. To find AC power supply type in the component box:Vac
3. To find GROUND type in the component box: GND
4. To find Ptype MOSFET type in the component box: MbreakP
5. To find Ntype MOSFET type in the component box: MbreakN
6. For pulse signal type: VPULSE(change values of the signal as: DC=5, AC=0,V1=0,V2=5,TD=5u,TR=TF=1n,PW=20,PER=40)
7. In the tool bar DRAW WIRE option exist. Connect the component with this wire to build the circuit.
Step 4: Save the schematic circuit with the .sch extension. Always try to give the name of the circuit. As an example don’t give your name as a circuit name.
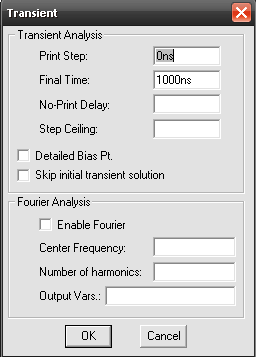
Step 4: To perform transient analysis click on Analysis button then click on the setup option. A box will open, uncheck the Bias Point Details and check the Transient option. Now click on transient a box will open and change the final time to 50us and press ok button.
Step 5: Open the saved file and press F11 to simulate.


this tutorial is very good.Sir can you please submit the other schematic circuit,those are gonna help me a lot.
ReplyDelete