Photoshop stylish professional business card tutorial and free template download
Hi friends today I am going to share with you an interesting topic. Today I am going to share with you how you can make a stylish pro...
https://things-for-students.blogspot.com/2014/01/photoshop-stylish-professional-business.html
Hi friends today I am going to share with you an interesting
topic. Today I am going to share with you how you can make a stylish professional
looking business card for yourself. Here in this tutorial I have used trial
version of Adobe Photoshop CS6. You can download it free from Adobe’s official
website. Some of my friends have requested for this tutorial. So friends, here
is the tutorial for you.

A business card basically contains business details of
someone’s business. The front side contains the Company Name, company Logo,
company contact details and back side contain other business details. Here I will
show you how to make the front side of the card. Business card is also a
cheapest medium of advertising. The funny thing about business card is that the
size is made such that so that you can carry it in your wallet.
The ideal business card size is 3.5”/2” (width/height).
Business card: Step 1
First create a new project. Press Ctrl+N to create a new
project. Ideal document size is 600/600 pixels.

Business card: Step 2
Create a new layer and draw a rectangle using “Rectangle Tool”.
Fill the box with color as shown in the picture. Now go to “Layer” menu option
and select “Rasterize” type “Shape”. This will remove extra hairline border
from the rectangle box.
Layer->Rasterize->Shape

Business card: Step 3
Now go to filter option and add noise to the rectangle (Filter->Noise->Add
noise) and select noise distribution type as Gaussian.

Business card: Step 4
Create another layer and create a rounded rectangle using “Rounded
Rectangle Tool”. Give it a color of your own or try the color as shown in card picture and perform Step 2 and Step 3.
Business card: Step 5
Now add text to this card. You can add custom shape to your
project using custom shape tool.
Business card: Step 6
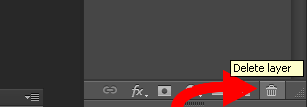
Now we will cut out text from the background or you can say
impressing text on background. To do that first select the first text layer and
go to Select->Load Selection and press OK. Now you see your text is
highlighted. Now delete this text layer from delete layer option and again press
Delete key from Keyboard. Now you get a cut out text.
Business card: Step 7
Now you have to cut out shape from background rounded
rectangle shape. To do this first right click on the shape layer and “Convert
to smart object”. Now go to select->Load Selection and press OK. Now delete
the shape layer from delete layer option and press delete key from keyboard.


Business card: Step 8
Now select the rounded rectangle shape layer and add a layer
style from blending option. Here you have to only use drop shadow option. Add drop
shadow value as shown in picture.

Business card: Step 9
Now select all layers except the background layer and merge
them using link layer option. This will allow you to move your card above the
background layer. If you want a transparent background card then just hide the
background layer.


